Enable/configure business hours
Business Hours add insights to activity on a commercial system. They can be configured for individual locations and business hours templates can also be created for groups. Business hours templates are used to apply business hours to multiple locations within an Enterprise group at once, saving the user time.
Apply Business Hours to single locations
Business hours can be applied to single locations using the Alarm.com customer website.
To apply Business Hours to single locations: 
- Log in to the Alarm.com customer website.
- Verify the individual location name is selected and not the Enterprise Group name.
- If an Enterprise Group is selected, use the dropdown menu to select the individual location. Enterprise Groups have
next to the Enterprise name, whereas individual locations will have
next to the location name.
- If an Enterprise Group is selected, use the dropdown menu to select the individual location. Enterprise Groups have
- Click Settings.
- Click Business Hours.
- Click the Enable Business Hours toggle switch to enable Business Hours.
Note: A default schedule for Business Hours will display.

- Click anywhere in the desired day's schedule to edit Business Hours.
- Select the desired times.
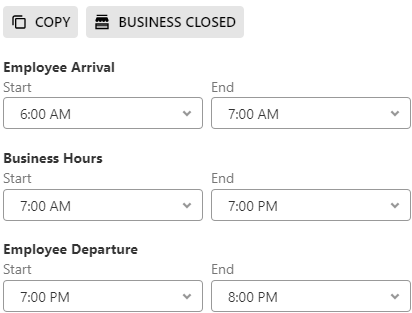
- In Employee Arrival, use the Start and End dropdown menus to select the timeframe that employees will arrive.
- In Business Hours, use the Start and End dropdown menus to select the Business Hours.
- In Employee Departure, use the Start and End dropdown menus to select the timeframe that employees will depart.
- Click Copy to have Employee Arrival, Business Hours, and Employee Departure times copied to other days of the week.
- Click Business Closed to have no Business Hours for the selected day.

Important: There must be no overlap between Employee Arrival, Business Hours, or Employee Departure.
-
Click to expand View Exception and Alert Preview to view how Open/Close events will be classified based on the currently selected Business Hours.
- Click Save.
Important: In order to save, Business Hours must be set for every day of the week. Use the Business Closed option for days when the business is not open.
Bulk apply Business Hours
Business Hours can be applied in bulk with templates using the Alarm.com customer website. Templates can be used to apply business hours to all locations or specific locations within a group.
For more information about how to configure groups, see Add a location to an Enterprise system.
To create a Business Hours template for locations within a group:
- Log in to the Alarm.com customer website.
- Verify the Enterprise Group is selected, and not a location name.
- If a location is selected, use the dropdown menu to select the Enterprise Group. Enterprise groups have
next to the Enterprise name, whereas locations will have
next to the location name.
- If the option to select an Enterprise group is not showing, verify the login being used has access to the Enterprise group.
- If a location is selected, use the dropdown menu to select the Enterprise Group. Enterprise groups have
- Click Settings.
- Click Business Hours.
- Click an existing business hours template to edit existing hours, or click Create new template to set new Business Hours.
Note: Business Hours will be applied only to the primary partition of each location that uses the template. This can be changed in the location's settings. - Click to select Enable Business Hours.
- Configure the Business Hours as desired for each day of the week.
- Click Copy to copy the selected Business Hours to other days of the week.
Note: In order to save, Business Hours must be set for every day of the week. There is a Closed option for days of the week that the business is not open.
- Click Copy to copy the selected Business Hours to other days of the week.
- Under Location Selection, click to select which locations the Business Hours apply to.
- If All Locations is selected, all locations under that Enterprise group will be selected.
- If Partial Access is selected, a pop-up window will appear allowing you to select which locations you would like to apply the Business Hours to.
- If No Locations is selected, none of the Enterprise locations will be given the selected Business Hours.
- Click Save.
Frequently asked questions
Can Business Hours affect certain notifications and report?
Yes. The following report and notifications require Business Hours to be set to be available:
Reports
- Location Open/Close Report - This report shows the Open/Close events for the location.
Notifications
- Opened Unexpectedly - This sends a notification when the system was disarmed after closing hours and before arrival hours.
- Not Opened On Time - This sends a notification when the system was not disarmed during arrival hours.
- Not Closed On Time - This sends a notification when the system was not armed during closing hours.
For more information about how to generate a Smarter Business Report, see Generate a Smarter Business Report.
Which time zone will the Business Hours follow?
Business Hours follow whichever time zone is set for the account.
Will Business Hours alerts and exceptions send notifications?
No. Enabling Business Hours causes Open/Close events at that location to be classified as On Time, Early, Late, or Unexpected. This classification will be included in the locations where you already see Open/Close events. To receive notifications or reports relating to Open/Close events, use the Notifications and Reports pages.
Is there a way to copy Business Hours for use across multiple days?
Yes. After setting up the hours for one day, click Copy to select as many days as desired.
Does editing location hours automatically arm or disarm the system?
No. It only uses the arm/disarm status of the system to provide information on the Locations page.
To automatically arm and disarm at certain times, set up arming schedules. For more information about automatic arming and disarming, see Create/edit an arming schedule.