How do I connect a video camera to a hidden Wi-Fi network?
You can connect a video device to a hidden (i.e., not broadcasting) Wi-Fi network by configuring its network settings manually using the Alarm.com customer website or the camera's access point network.
Important: When attempting to manually connect to a wireless network, it is necessary to type in all information about the network. Accuracy is crucial, so it is advisable to confirm the network information is correct. If you are uncertain, confirm with the person who set up the network.
Manually configure a video device's wireless network
- If the video device is currently connected to the Internet with an Ethernet cable and installed on the account, proceed to To manually configure a video device's wireless network using an Ethernet cable.
- If the video device is not currently connected to the Internet and cannot be connected temporarily using an Ethernet cable, proceed to To manually configure a video device's wireless network using AP mode.
To manually configure a video device's wireless network using an Ethernet cable:
Use this method when the video device is already installed on the account and connected with an Ethernet cable.
- Log in to the Alarm.com customer website.
- Click Video.
- Click Settings.
- Select the desired video device.
- Click Network.
- Click Change Network.
- Click Manual.
- In the Wireless Network Name (SSID) field, enter the Wi-Fi name. This is case-sensitive.
- Using the Encryption Type dropdown menu. select the encryption type.
- Using the Algorithm dropdown menu, select the encryption algorithm.
- In the Password field, enter the Wi-Fi password. This is case-sensitive.
- If you want these settings to apply to all wireless cameras on the account, click Advanced. Then click to select Apply these settings to all wireless cameras on this account.
- Click Continue.
- After the correct information is saved in these fields, remove the power cable from the camera, then remove the Ethernet cable.
- Reconnect the power cable and wait for the status LED to turn solid green.
To manually configure a video device's wireless network using AP mode:
Use this method when the video device is not installed on the account and cannot be installed temporarily with an Ethernet cable.
- Put the camera into access point mode.
- Press and hold the WPS button on the camera for 5 to 7 seconds. The camera LED will first blink blue before blinking white.
- Release the button immediately once the LED begins to blink white.
- From a Wi-Fi-enabled device, connect to the Wi-Fi network named ALARM (##:##:##).
- The numbers in parentheses should be the last six digits of the camera’s MAC address.
- Open a web browser on the Wi-Fi-enabled device (e.g., Chrome, Firefox, Edge, etc.).
- In the browser address bar, enter 192.168.1.1.
- Press Enter to go to the web address.
- Click to select a language.
- Manually enter the Wi-Fi information:
- In the SSID field, enter the Wi-Fi name. This is case-sensitive.
- Using the Security dropdown menu, select the encryption type.
- Select the Key Format, which is the algorithm.
- In the Security Key field, enter the Wi-Fi password. This is case-sensitive.
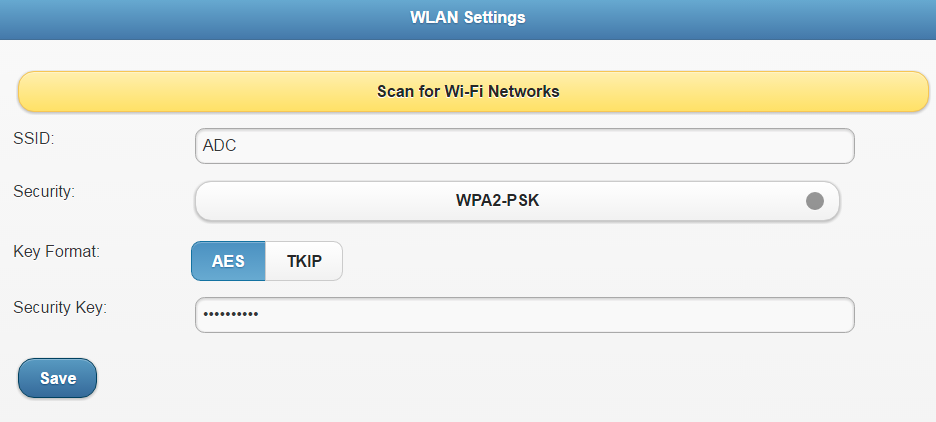
- Click Save.
- If the video device is not already installed on your account, proceed to the Alarm.com app or Alarm.com customer website to install the video device.
Need more help?
If you have attempted the previous steps but are still unable to connect your camera to your hidden network, contact your service provider for further assistance. To learn more about where you can find your service provider's contact information, see Contact your service provider.