Pan-tilt-zoom (PTZ) support for third-party cameras
Customers can utilize the pan, tilt, and zoom functions on their third-party cameras in real time, allowing them to use one camera to conveniently monitor multiple angles. Once areas of interest have been identified, customers can save those pan-tilt-zoom (PTZ) settings as a preset view for quicker viewing access in the future.
Compatibility requirements
- A Commercial Video Plus service package
- A supported third-party PTZ camera connected to a compatible Alarm.com Stream Video Recorder.
Note: For more information on compatible third-party cameras, see Which third-party cameras are compatible?.
Control PTZ lens position
Pan-tilt-zoom settings can be adjusted using the Alarm.com customer website.
- Log in to the Alarm.com customer website.
- Click Video.
- Mouse over the desired video, then click
 .
. - Use the directional pad buttons, or use a mouse to interact with the live view screen to change the camera's field of view.
- Using the directional pad buttons:
- To zoom in, click
 .
. - To zoom out, click
 .
. - To pan, click
 ,
,  ,
,  , or
, or  .
. - To reset to default, click
 .
.
- To zoom in, click
- Using the screen-based interactive movements:
- Click and hold the mouse on the live view screen, then move the cursor in the desired direction.
- The direction of the cursor's end point from center dictates the direction of movement.
- The distance from the end point to the center dictates the velocity of movement.
- Using the directional pad buttons:
Configure camera preset views
Customers can save preferred PTZ lens positions as a camera preset using the Alarm.com customer website for quicker access. Each camera can save up to five preset views, and the order of the preset views for each camera can be edited for more convenient navigation.
To save a new camera preset
- Log in to the Alarm.com customer website.
- Click Video.
- Mouse over the desired video, then click .
- Adjust the PTZ lens position to the desired field of view.
- Click New preset.
- Enter a name for the camera preset.
- Click Save.
To reorder and delete camera presets
- Log in to the Alarm.com customer website.
- Click Video.
- Mouse over the desired video, then click .
- Click Edit presets.
- In Edit Presets:
- Click and drag
 to re-order the camera presets.
 - Click
 to delete a camera preset.
- Click and drag
- Click Save.
Troubleshooting
The PTZ icon is grayed out on live view
If the PTZ icon is visible on the device's live view but is grayed out and you cannot interact with it to control the lens position, verify the Pan-Tilt and Zoom settings are enabled on the device. These settings can be configured using the Alarm.com customer website and Alarm.com app.
Alarm.com customer website steps
- Log in to the Alarm.com customer website.
- Click Video.
- Click Settings.
- Select the desired video device.
- Click General.
- Click Advanced Setup.
- In Device Capabilities:
- Click the Panoramic Lens toggle switch to disable the Panoramic Lens feature if it is enabled.
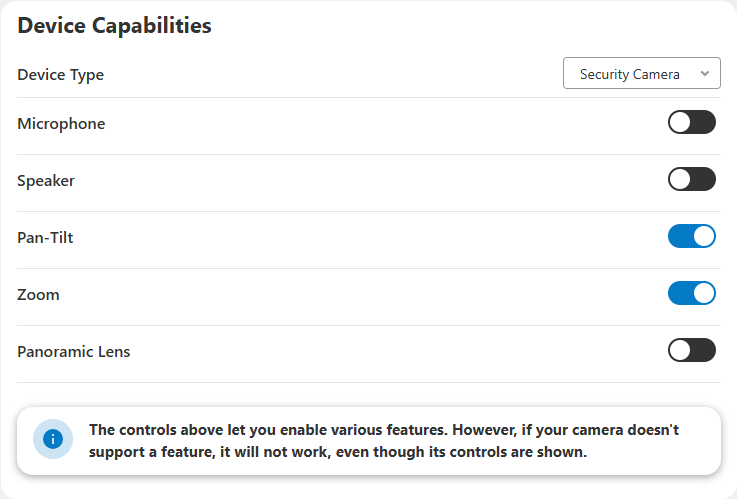
- Click the Pan-Tilt toggle switch to enable the Pan-Tilt feature.
- Click the Zoom toggle switch to enable the Zoom feature.
- Click the Panoramic Lens toggle switch to disable the Panoramic Lens feature if it is enabled.
- Click Save.
Alarm.com app steps
- Log in to the Alarm.com app.
- Tap
 .
. - Tap
 .
. - Select the desired video device.
- Tap General.
- Tap Advanced Setup.
- In Device Capabilities:
- Tap the Panoramic Lens toggle switch to disable the Panoramic Lens feature if it is enabled.
- Tap the Pan-Tilt toggle switch to enable the Pan-Tilt feature.
- Tap the Zoom toggle switch to enable the Zoom feature.
- Tap the Panoramic Lens toggle switch to disable the Panoramic Lens feature if it is enabled.
- Click Save.