Associate a security device to a continuously recording camera
Looking for Linked Devices or Linked Systems?
Linked Devices are devices that were recently used to log into your account. For more information, see What is Two Factor Authentication?.
Linked Systems allows you to switch between logins on your account easily. For more information, see How can multiple account systems be linked?.
Associate a supported security device to a continuously recording video camera to find relevant recordings quickly. Go directly from an event triggered by the security device on the Activity page to the relevant footage from the camera.
To record an on-demand clip based on sensor activity from a video device that does not have continuous recording, see Create/edit a Sensor Open/Closed recording rule.
Supported security devices
- Sensors (e.g., intrusion, contact, or motion sensors)
- Smart locks
- Garage doors
- Access Control
Create Quick Links
Quick Links allow customers to quickly access footage by associating a camera to a security device. Quick Links can be created using the Alarm.com customer website and Alarm.com app.
To create Quick Links using the Alarm.com customer website:
- Log into the Alarm.com customer website.
- Click Settings.
- Click Manage Devices.
- Click
 next to the desired security device.
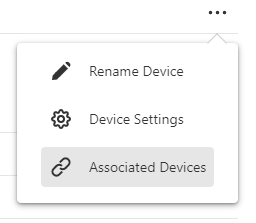
- Click Associated Devices.
- Click to select up to four cameras.
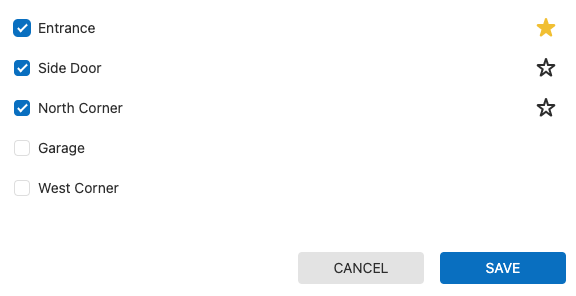
- Click
 next to a camera to make it the primary camera for that security device.
 - Click Save.
To create Quick Links using the using the Alarm.com app:
- Log into the Alarm.com app.
- Tap
 .
. - Tap the desired activity event.
- Tap Go to Recordings.
- Tap the Associate Camera toggle switch to enable associating cameras to a security device.
- Tap the desired camera to associate the camera to a security device.
- Tap the desired camera.
- Tap the desired activity event to view the recording.
View linked footage
After Quick Links are created, the footage tied to the linked device and Activity event can be viewed using the Alarm.com customer website and Alarm.com app.
To view linked footage using the Alarm.com customer website:
- Log into the Alarm.com customer website.
- Click Activity.
- Click Filters to narrow down your search.
- Locate the desired Activity event.
- Click the desired clip to view the recording.
Note: If there is more than one clip associated with an Activity event, or you would like to view the clip through the SVR Timeline, click the event to expand it. Then click  .
.
To view linked footage using the Alarm.com app:
- Log into the Alarm.com app.
- Tap .
- Tap
 to use filters to narrow down your search.
 - Tap the desired Activity event.
- Tap the desired clip to view the recording.
- To view the recorded clip through the video player, tap the desired sensor activity, then tap Go to Recordings.
Note: If there is more than one clip associated with an event, tap to expand the event. Then tap the desired clip to view the recording.
Remove Quick Links
Quick Links can be removed using the Alarm.com customer website and Alarm.com app.
Remove Quick Links using the Alarm.com customer website:
- Log into the Alarm.com customer website.
- Click Settings.
- Click Manage Devices.
- Click on the desired security device.
- Click Associated Devices.
- Click to deselect the desired cameras.
- Click Save.
Remove Quick Links using the Alarm.com app:
- Log into the Alarm.com app.
- Tap
 .
. - Tap Manage Devices.
- Tap on the desired security device.
- Tap Associated Devices.
- Tap to deselect the desired cameras.
- Tap Save.