
Video Intercom Mobile Directory (VIMD) - Customer Installation Guide
The Video Intercom Mobile Directory (VIMD) is Alarm.com's first intercom solution. This cost-effective system transforms existing Alarm.com entry management hardware (e.g., video doorbells and Access Control) into a fully functional video intercom solution.
This solution allows the following:
- Property managers and/or business owners have full control over video, access settings, and directory management.
- Visitors scan a QR code at the entrance to reach the directory and start a call.
- Tenants and/or employees view and verify visitors over video, and then unlock the door from the Alarm.com Alarm.com app.
Additional video intercom solution guides
- For detailed steps and information on setting up single-button BAS-IP intercom panels (e.g., the AV-08FBL), see BAS-IP Single-Button Video Intercom Mobile Directory (VIMD) - Customer Installation Guide.
- For detailed steps and information on setting up multi-button BAS-IP intercom panels, see BAS-IP Video Intercom Integration - Customer Installation Guide.
Setup overview
Note: For detailed steps and additional information on setting up VIMD, proceed to Set up accounts for Video Intercom Mobile Directory (VIMD).
- Install and enroll hardware on the main property manager account.
- At least one Access Control door needs to be added to the account in order to complete the intercom setup process.
- If there are separate property accounts for tenants, your service provider will link those accounts to the main property manager account.
- Using the Alarm.com customer website:
- Create logins for each recipient (e.g., tenant, staff).
- Set up the directory and generate the QR code for buildings using the main property manager account.
- Add all recipient logins to the Directory.
- Each recipient enrolls their chosen mobile devices in the Alarm.com app.
Note: Recipients do not appear in the Directory until they enroll at least one mobile device. - Visitors scan the QR code to select the recipient they want to call.
Compatibility requirements
The Video Intercom Mobile Directory functionality requires the following:
| Compatible video cameras |
Alarm.com wired doorbell cameras:
Supported BAS-IP single-button intercom panels on firmware version 4.1.1+:
Note: For the steps to enroll a BAS-IP single-button intercom panel, see BAS-IP Single-Button Video Intercom Mobile Directory (VIMD) - Customer Installation Guide.
|
|---|---|
| Compatible access control readers |
|
| Service package add-ons |
The main property manager account should include Access Control, Doorbell Camera, and Video Intercom Management capabilities. Note: These accounts can manage intercom settings and configure Directory lists. Logins on this account can also be intercom call recipients.
Property tenant accounts should include Video Intercom User capabilities. Note: These accounts must be linked to a main property manager account. Logins on this account can be configured as call recipients on the linked main property manager account.
For more information about what these different account types are, see What service package add-on should I select (single vs multiple accounts)?. |
Set up accounts for Video Intercom Mobile Directory (VIMD)
To use VIMD, each of the following must be completed in order.
Install and enroll hardware on the customer account
All hardware (i.e., video doorbells and Access Control readers) should be installed and enrolled on the main property manager account. At least one video doorbell and one Access Control reader must be installed and enrolled in order to complete VIMD setup.
- For steps and additional information regarding video device installation, see Video Devices.
- For steps and additional information regarding Access Control reader installation, see Access Control.
Configure the customer account(s)
The following outlines what each customer account must do to set up the Video Intercom Mobile Directory.
Important: Before continuing, make sure the video doorbell and Access Control reader hardware is installed, the main property manager account and any tenant accounts have their service packages properly configured, and the main property manager account and any tenant accounts are properly linked.
For the main property manager account:
Once the hardware is installed, the account and logins within a single system or system group are set up to create logins eligible for the intercom Directory.
Important: These options will not be available if the service package is not configured correctly.
- Log in to the Alarm.com customer website.
- Click Video.
- Click Intercom.
- Click Start or
 to set up an intercom.

- In Connect a QR Code, select whether you are generating a new QR code or using an existing QR code on the account.
- If using an existing QR code on the account, use the dropdown menu to select the desired QR code.
Note: Existing QR codes will only appear on this list if they are not currently associated with a video device.
- If using an existing QR code on the account, use the dropdown menu to select the desired QR code.
- Configure directory settings (i.e., logo, directory header, and helper text for the welcome message). Then click Next.

- Select a video device to link to the intercom, then click Next.

- Select associated access control doors to link to the intercom, then click Next.

- For the Display Type, select either Recipient Name or Unit Number. Then click Next.

- Click to select either Use an existing directory or Create a new directory.

- If you are using an existing directory, use the Select a Directory dropdown menu to select the desired directory, then click Next.
- If you are creating a new directory, click Next.
Note: Each recipient will receive a push notification or email invitation with enrollment steps they must complete before appearing in the intercom directory.
To be eligible for the directory, logins must have either Master Control, Full Control, or Limited Device Access for Intercom to selected directories. New logins can be created within a single system or system group for users who need to be added to the intercom directory.- In Add Call Recipients, click to select the desired recipients for the directory, then click Next.
- In Select Favorites:
- Click the Concierge toggle switch to enable the Concierge feature if desired.

- Click the checkboxes to designate specific Favorite recipients if desired, or click Select All to select all listed recipients as Favorites.
- Click the Concierge toggle switch to enable the Concierge feature if desired.
- Click the Doorbell Button Press toggle switch to enable visitor confirmation (i.e., Doorbell Button Press, Visitor Call PIN) if desired, then click Next.

Note: It is recommended to not enable doorbell call notifications if the Concierge feature is enabled. - Download the generated QR code and display it outside the designated door where the intercom will be set up.

- Review the Intercom's current setup, then click Save & Exit.

For tenant accounts:
Tenants are the intercom recipients receiving the call. The following steps can be completed after the main property manager account sets up the intercom directory and creates the QR code for it.
Important: This process must be completed using the tenant login credentials. Linked Logins will not be able to view or complete these steps.
To set up intercom as a tenant:
- Intercom recipients receive an email invitation with instructions on how to download the Alarm.com app and enroll.
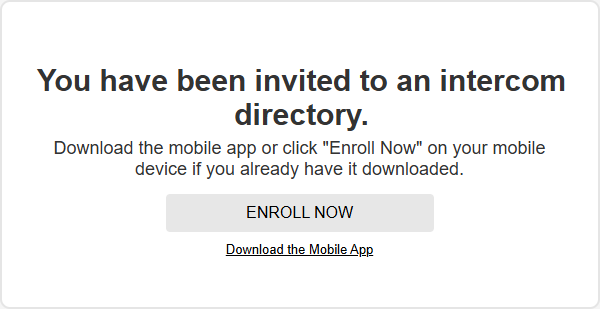
Note: Users will not receive this email if this is not their first Alarm.com account. - After logging in to the Alarm.com app, tenants have access to an Intercom dashboard card, prompting them to enroll and set up their intercom profile. Tap Enroll.

Note: If part of a system group, recipients must switch to the community system before initiating the enrollment process. - Tap Get Started.

- Enter the required name information, then tap Next.

- To complete intercom enrollment and create an intercom call push notification rule, tap Agree & Save.

- Once enrolled, the Intercom card will update to show the door status.
- System group members will only see this card while switched to the community system.
Note: The intercom card on the Alarm.com app can be used to buzz open the door on demand.
Favorite recipients and Concierge
Setting a recipient as a Favorite will allow that recipient to show up at the top of the directory, making it easier for property managers to ensure frequently called persons (e.g., the front desk) can be quickly viewed and accessed. Main property managers can also enable the Concierge feature, which designates all Favorite recipients to receive an intercom call any time the doorbell button is pressed.
Note: It is recommended to not enable doorbell call notifications if the Concierge feature is enabled.
To set up Favorite recipients and Concierge
Users can set up Favorite recipients and enable the Concierge feature using the Alarm.com customer website.
- Log in to the Alarm.com customer website.
- Click Video.
- Click Intercom.
- In Intercoms, click
 for the desired Intercom.
- Click Edit Intercom.
- In Summary, click
 next to Favorites.
- In Select Favorites:
- Click the Concierge toggle switch to enable the Concierge feature.
- Click the checkboxes to designate specific Favorite recipients, or click Select All to select all listed recipients as Favorites.
- Click Save & Exit to finish setup, or click Back or Next to review other settings for the selected Intercom.
Unit View for multi-account setups
For Video Intercom Solutions with separate tenant accounts linked to a main property manager account, it is possible to configure the tenant accounts to display alternate information (e.g., the tenant's unit, apartment, or suite information) for their Directory listing to retain tenant privacy. To have Unit View names set up on individual tenant accounts, contact your service provider.
IQ Panel integration
Compatible Qolsys panels (i.e., IQ Panel 4 and IQP4 Hub on software version 4.6.1+, and IQ Panel 5 and IQP5 Hub on software version 5.0.2+) can receive intercom notifications at the panel. When a call comes in, users receive a snapshot of the visitor and can choose to buzz them in directly or start a live viewing session. They can then choose to buzz the visitor in from the live view screen.
To enable notifications to the Qolsys Panel
Notifications from the intercom Video Doorbell to the Qolsys Panel can be enabled using the Alarm.com app or Alarm.com customer website.
Note: For tenant accounts that do not have video devices, this permission is automatically enabled.
Using the Alarm.com app:
- Log in to the Alarm.com app on the tenant account.
- Tap
 .
- Tap
 .
- Tap Stream Video To Panel.
- Tap to select the desired Video Doorbell to stream to the panel.
- Tap Save. Allow a few minutes for the settings to save to the panel. The panel may need to be power cycled for changes to take effect.
Using the Alarm.com customer website:
- Log in to the Alarm.com customer website on the tenant account.
- Click Video.
- Click Settings.
- Click Stream Video to Panel.
- In Select Cameras, click to select the Video Doorbell.
- Click Save.
To configure the Qolsys Panel as a notification recipient
Tenants can configure the Qolsys Panel as a notification recipient for their intercom calls using the Alarm.com app.
- Log in to the Alarm.com app on the tenant account.
- Tap the Intercom card.
- Tap .
- Tap Notifications.
- In Recipients, tap to select the Panel.
- Tap OK.
Using Video Intercom Mobile Directory
For tenants
The following is an example of the push notification the tenant receives and what the tenant sees during the call:


If the call is not answered, the tenant will receive a missed call push notification. The following is an example of what the tenant sees in the Alarm.com app:


To change intercom contact/call notification settings:
- Log in to the Alarm.com app.
- Tap the Intercom card.
- Tap .
- To edit the intercom contact information:
- Tap .
- Update the intercom contact information as desired.
- Tap Save.
- Tap
- To edit the call notification settings:
- Tap Notifications.
- Configure the intercom notification as desired.
- Tap OK.
- To edit the intercom contact information:
For visitors
Note: Visitors are the users scanning the QR code at the entrance to start a call.
To set up and use intercom as a visitor:
- Scan the QR code displayed on the property to access the intercom directory webpage.
- Select the user to initiate a call.
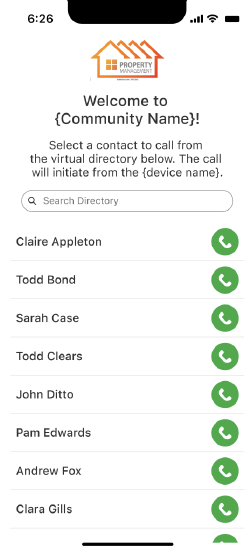
- A call screen will appear in the browser, showing the call is in progress.
- Tenants and visitors can engage in a two-way conversation using the video device. The tenant will see the visitor via the video device, but the visitor will not see the tenant. The following image is what visitors see during a call.

Frequently asked questions
For additional questions, see Video Intercom Solutions - Frequently asked questions.
Who appears in the Directory?
Who appears in the Directory?
Who appears in the Directory?
Who appears in the Directory?Any user with a login on an account that includes an intercom service package add-on can be added to the Directory. This includes logins on the main property manager account and logins on tenant accounts.
After being invited, each user must enroll at least one mobile device through the Alarm.com app to appear in the Directory. For more information about how users enroll mobile devices, proceed to To set up intercom as a tenant.
Users can enroll as many mobile devices as they like, within the limits of their customer account service package.
Note: In the MDU setting, each login under a unit’s account will be listed separately in the Directory (e.g., they will appear as Mark, Lucy, and Charlie—not as Smith Family.)
What service package add-on should I select (single vs multiple accounts)?
What service package add-on should I select (single vs multiple accounts)?
What service package add-on should I select (single vs multiple accounts)?
What service package add-on should I select (single vs multiple accounts)?The following table outlines the differences between the two service package options for Video Intercom Solutions.
Note: Only one of the Video Intercom service package add-ons can be applied to a customer account at a time.
| Video Intercom Management add-on | Video Intercom User add-on or base package | |
|---|---|---|
| Account owner | The building or property manager | Individual tenants |
| Property type |
Properties managed under a single Alarm.com account. There are two subtypes:
|
For properties where each business or resident maintains their own separate Alarm.com account. |
| Hardware requirements | An Alarm.com video doorbell and Access Control system | N/A since hardware would be enrolled on the main property manager account |
| Capabilities | Create, manage, and control the intercom Directory | Create listings in the intercom Directory |
Single account
Single accounts are best for a single organization or a building where all tenants agree to use one shared Alarm.com customer account.
Each person or department can have their own login in the directory, and each login can connect to multiple devices. The account will have the Video Intercom Management add-on.
Examples:
- A law firm’s staff are all on one account (each attorney/staff has their own login).
- A multi-tenant property where building management runs the intercom system and gives each tenant a login.
Multi-account
Multiple accounts are best for a building with multiple businesses or residents where each wants to maintain their own separate Alarm.com account.
The building/property manager's account becomes the main account with Video Intercom Management add-on, and each tenant has their own account with Video Intercom User add-on or base service package. Each account can have multiple logins/devices.
Examples:
- An office building where each business is responsible for its own account, or
- A residential building (MDU) with each apartment/unit having its own account.
What are example setups for Video Intercom Solutions?
What are example setups for Video Intercom Solutions?
What are example setups for Video Intercom Solutions?
What are example setups for Video Intercom Solutions?Small law firm (single account)
Scenario: Four staff members (reception, admin, two attorneys) will appear in the Directory. The receptionist uses both a phone and an iPad.
Steps to set up:
- Install the doorbells and Access Control hardware.
- Verify your Alarm.com customer account has the correct service package configuration with your service provider.
- Using the Alarm.com customer website:
- Create logins for each staff member.
- Set up the Directory and generate the QR code.
- Add all staff logins to the Directory.
- Each staff member enrolls their chosen mobile devices in the Alarm.com app.
- Visitors scan the QR code to select the staff they want to call.
Office building (multiple businesses with separate accounts)
Scenario: Four businesses and a concierge; each business gets its own account. One business (a salon) wants three staff members in the Directory.
Steps to set up:
- Install the doorbells and Access Control hardware.
- Verify your Alarm.com main property manager account and all tenant accounts have the correct service package configuration with your service provider.
- Verify with your service provider that each business's tenant account is linked to the main property manager account.
- Using the Alarm.com customer website:
- Create logins for all recipients (concierge and each business’s staff).
- Set up the Directory and generate the QR code using the main property manager account.
- Add all recipient logins to the Directory.
- Each recipient enrolls their chosen mobile devices in the Alarm.com app.
- Visitors scan the QR code to select the recipient they want to call.
School with multiple entrances (single account)
Scenario: Three buildings, each with an entrance and two staff, plus an admin who covers all three.
Steps to set up:
- Install the doorbells and Access Control hardware at each entrance.
- Verify your Alarm.com customer account has the correct service package configuration with your service provider.
- Using the Alarm.com customer website:
- Create logins for each staff member and admin.
- Set up the Directories and generate the QR code for each building.
- Create three separate Directories (one per entrance), adding appropriate staff and the admin to each.
Note: The admin will need to enroll for all three Directories.
- Each staff member and admin enrolls their chosen mobile devices in the Alarm.com app.
- Visitors scan the QR code at each building to select the staff or admin they want to call.