
AI Deterrence (AID) Autonomous Audio Response Service
Stop intruders in their tracks with Alarm.com's adaptive crime deterrent solution, AI Deterrence (AID) Autonomous Audio Response Service. AID combines innovative AI with Alarm.com's industry-leading Video Analytics to deliver AI-generated audio responses to intruders.
AID recognizes that there is a trespasser, what they are wearing, what color their clothes are, and their location on a property. Its adaptive verbal warnings create the impression of a live operator response but at a lower cost and latency than traditional operator-initiated Two-Way Talkdown.
AID can be configured as part of any recording rule. When used alongside Remote Video Monitoring (RVM) services, AID helps build a moat of protection around customers' homes and businesses.
Important: This feature is intended for instances where a subject is in an unexpected, specific area. Avoid using it in an area or time with high occupancy and foot traffic.
Compatibility requirements
- A service package that supports Video Analytics with the ability to utilize AI Deterrence and audio on non-doorbell cameras.
- The customer must accept the Audio recording Agreement. For more information, proceed to Customer Audio recording Agreement.
- The customer must accept the AI Deterrence Agreement. For more information, proceed to Customer AI Deterrence Agreement.
- One of the following Alarm.com video cameras:
Camera model Firmware version requirement Progressive Responses ADC-V515 0.0.5.549+ 
ADC-V516 0.0.3.104+ 
ADC-V523/523X 0.8.2.048+ ADC-V530 - ADC-V716 - ADC-V724/724X 0.8.2.048+ ADC-V729/V729AC/VC729P 0.8.2.048+ ADC-V730/VC730P - ADC-V731B 10.0.6+ ADC-VC727P 0.8.2.048+ ADC-VC7398PA - ADC-VC8498PA - ADC-VC8498P - ADC-VDB775 - ADC-VDB781B 4.0.7+ - Perimeter GuardTM light or audio responses enabled. For more information, see Perimeter GuardTM for video devices.
Note: We recommend setting the saved video resolution to max to provide the best image quality and accurate AI-generated descriptions. For more information about adjusting the saved video resolution, see Adjust saved video resolution, image quality, or frame rate.
Customer Audio recording Agreement
Customer AI Deterrence Agreement
Once the AI Deterrence service package add-on has been added to the customer's account, the customer will need to log in to their account and accept the AI Deterrence Agreement before they will have the option to create an AID recording rule.
Note: Due to the close proximity between the speaker and microphone on Alarm.com cameras, the AID verbal prompt within stored video clips may be loud and unclear. AID prompt volume and clarity optimizations are currently being prioritized for development.
Custom Responses (Text-to-Speech)
Custom Responses can be added using the Alarm.com customer website, and allow customers to craft personalized text-to-speech audio alerts for any scenario, visitor, or business need. Users simply enter their custom message and select from a variety of voice and tone options. Whenever a Video Analytics event is triggered, the camera instantly plays the personalized audio message to notify the visitor. Alarm.com safeguards the experience with built-in content filtration, ensuring all custom messages remain appropriate, clear, and on-brand.
For a step-by-step tutorial video on how to create a custom response AID recording rule, see How to configure a custom response AI Deterrence Recording Rule - Video.
Note: Custom Responses do not count towards users' monthly AID quotas. However, the number of devices that can use the feature will still be limited based on the selected service package add-on tier.
Progressive Response Mode
Progressive Responses further enhance AID by allowing users to configure 2-3 escalating warning messages per recording rule to address continuous loitering and intrusion events. Progressive Response Mode utilizes Dynamic Responses for multiple configurable loiter durations. Responses can start with subtle verbal warnings and gentle tones, then gradually intensify to stern warnings, sirens, and light alerts, and if the final stage is triggered it will send a Remote Video Monitoring (RVM) monitoring station event.
Important: RVM forwarding only occurs at the final stage of a Progressive Response rule to reduce false alarms and avoid unnecessary, intermediate notifications.
How it works
- Create a new recording rule, or edit an existing rule, and configure 2-3 Progressive Response stages.
Important: Progressive Response Mode requires the recording rule to utilize a Ground Zone. It is not possible to use a Tripwire with Progressive Response Mode. - The response style configured for Stage 1 is automatically applied and maintained through the subsequent stages of escalation.
- Configure loiter duration conditions for each response stage:
Stage number Loiter duration options Stage 1 0.5 – 120 seconds Stage 2 30 – 45 seconds Stage 3 30 – 45 seconds Note: The Duration inside area of interest value for each stage represents the time an individual must loiter in the configured Ground Zone after the previous stage was triggered in order to trigger the next stage.
- If Stage 1's Duration inside area of interest is set to 5 seconds, the Stage 1 Dynamic Response will trigger after an individual has remained inside the Ground Zone for 5 seconds continuously.
- If Stage 2's Duration inside area of interest is set to 30 seconds, Stage 2 will trigger 30 seconds after Stage 1 was initially triggered.
- If Stage 3's Duration inside area of interest is set to 45 seconds, Stage 3 will trigger 45 seconds after Stage 2 was initially triggered.
- AID handles groups of people independently, tracking each detected individual within the Ground Zone with a separate loiter duration timer. If an individual leaves the Ground Zone, their respective loiter duration state is reset.
- Response accuracy and delivery may be reduced for groups larger than four people.
- A clip recording is only generated for the initial Stage 1 response. When Stage 2 and Stage 3 are triggered, the video device will take a snapshot of the activity at the time the stage is triggered.
- Alarm.com app push notifications will only be sent when the first stage of a Progressive Response Mode rule is triggered.
- Monitoring station events will only be forwarded once the final stage of a Progressive Response Mode rule is triggered.
Progressive Response Mode limitations
Ground Zone requirement
Progressive Response Mode can only be configured with Video Analytics rules that utilize a Ground Zone rule type. Tripwires are not compatible with this configuration.
Dynamic Response requirement
Progressive Response Mode can only be configured to utilize Dynamic Responses. Custom Responses are not compatible with this configuration.
Continuous presence requirement
To progress through its response stages, the system must be able to confidently observe continuous human presence within the defined Ground Zone for the configured loitering duration under suitable visual conditions. If the person leaves the Ground Zone area after triggering the Stage 1 response, tracking is stopped and the system resets to its previous state before Stage 1 was triggered. If the same person re-enters the Ground Zone after the system has reset, it is treated as a new event. This continuous presence requirement helps ensure that response escalations are based on uninterrupted loitering within the defined area.
Important: AID may not be able to continuously track the target if it is not consistently observable. If a person remains completely still within the Ground Zone for an extended period of time, steps partially outside of the Ground Zone, becomes heavily obstructed from the video device's view, or the scene shifts to low-contrast or infrared conditions, the system may interpret their continuous presence as having ended and reset stage progression. In these cases, the initial response will still behave as configured, and progression will restart from Stage 1 once presence is clearly re‑established and maintained.
Alarm.com app push notifications
Alarm.com app push notifications will only be sent when the first stage of a Progressive Response Mode rule is triggered.
Note: The ability to customize push notifications for each stage of a Progressive Response Mode rule will be available in the future.
Monitoring station event forwarding for RVM events
RVM events will only be forwarded once the final stage of a Progressive Response Mode rule is triggered.
Note: The ability to customize monitoring station event forwarding for each stage of a Progressive Response Mode rule will be available in the future.
Best Practices
- Verify the scene has consistent lighting. Lighting conditions that allow for the video device to operate using its full color mode instead of low-contrast or infrared modes is ideal.
- Draw tight Ground Zones around the intended monitoring area and avoid high-traffic backgrounds.
- Verify the video device can maintain a clear line of sight to the Ground Zone. If the configured Ground Zone area is constantly obstructed by passing vehicles or heavy foot traffic, Progressive Response Mode may not be able to trigger.
- Position the video device in a way that minimizes the possibility of a person becoming hidden behind an object within the Ground Zone.
Create an AID recording rule
Customers can create AID recording rules or edit existing rules using the Alarm.com customer website or Alarm.com app.
Note: We recommend enabling AID on one of the recording rules (of the three available per camera) to be active only during certain timeframes. Enabling this when areas have less foot traffic or clip uploads, like at night or after business hours, can help reduce the number of erroneous AID events. Adding "AID" to the name of the recording rule can be helpful for easy identification.
For more information about AID best practices, see Avoid excessive event usage.
- Log in to the Alarm.com customer website.
- Click Video.
- Click Recording Rules.
- Click Add New Rule.
- Click to select Video Analytics.
- Click to select the desired video camera.
- In Select Type, click to select the desired rule type.
- Click Next.
- In Motion area, configure the Ground Zone or Tripwire.
- Configure the options in the Recording Rule section as desired.
- Click Only during the following times to configure specific timeframes for the AID-enabled recording rule to be active.
- In Perimeter Guard, click the AI Deterrence Alert toggle switch to enable AI Deterrence for the recording rule. Dynamic Response is the default selection.
- Using the Response Type dropdown menu, select the response type (i.e., Deterrence (Default), Leave A Message, Not Accepting Visitors, Professionally Monitored, Property Closed, Trespassing).
- Depending on the selected Response Type, select available Options and Voice Type (i.e., John-Angry) settings.
- Using the Message Volume slider, adjust the volume of the AID Alert.
- Drag the slider past
 to enable the Boost AI Deterrence Audio Gain feature.
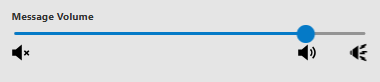
Note: Enabling this feature will increase the maximum audio range of the AI Audio but can cause distortion that affects audio clarity.
This slider value is shared with Two-Way Audio volume; however, the boost option only applies to AID. The volume slider is disabled when the boost is active, so it must be disabled to lower the audio volume.
- Drag the slider past
- Configure the Camera Light Alert and Camera Audio Alert as desired.
- Using the Set minimum delay between Alerts dropdown menu, select the minimum delay between the end of one Dynamic Response Alert and the beginning of the next Dynamic Response Alert.
- Configure the rest of the recording rule as desired.
- Click Save.
- Log in to the Alarm.com customer website.
- Click Video.
- Click Recording Rules.
- Click Add New Rule.
- Click to select Video Analytics.
- Click to select the desired video camera.
- In Select Type, click to select the desired rule type.
- Click Next.
- In Motion area, configure the Ground Zone or Tripwire.
- Configure the options in the Recording Rule section as desired.
- Click Only during the following times to configure specific timeframes for the AID-enabled recording rule to be active.
- In Perimeter Guard, click the AI Deterrence Alert toggle switch to enable AI Deterrence for the recording rule. Dynamic Response is the default selection.
- In AI Deterrence Alert, click Custom Response.
- In Message, enter the desired response.
Note: Make sure the text entered in the Message field uses correct spelling and grammar, and add spaces before and after numbers. - Using the Voice Type dropdown menu, select the desired voice and tone for the message.
- Configure the Camera Light Alert and Camera Audio Alert as desired.
- Using the Set minimum delay between Alerts dropdown menu, select the minimum delay between the end of one Custom Response Alert and the beginning of the next Custom Response Alert.
- Confirm the rest of the recording rule is configured as desired.
- Click Save.
- Log in to the Alarm.com customer website.
- Click Video.
- Click Recording Rules.
- Click Add New Rule.
- Click to select Video Analytics.
- Click to select the desired video camera.
- In Select Type, click to select Ground Zone.
- Click Next.
- In Motion area, configure the Ground Zone.
- Configure the options in the Record a Clip section as desired.
- Click Custom to configure specific timeframes for the AID-enabled recording rule to be active.
- Click the Perimeter Guard toggle switch to enable Alerts for the recording rule.
- Click Progressive Response Mode.
- In Stage 1, click
 to view the current Stage 1 settings.
- Using the Duration inside area of interest dropdown menu, select how long an individual needs to loiter within the Ground Zone to trigger the Stage 1 Progressive Response.
Note: This Duration inside area of interest value cannot be smaller than the Duration inside area of interest value configured in the Record a Clip section of the recording rule. If you want the Stage 1 Progressive Response to trigger at the same time the recording rule itself is triggered, set both Duration inside area of interest dropdown menus to the same numerical value. - Click the AI Deterrence Alert toggle switch to enable AI Deterrence for the recording rule.
- Using the Response Type dropdown menu, select the response type (i.e., Deterrence (Default), Leave A Message, Not Accepting Visitors, Professionally Monitored, Property Closed, Trespassing).
- Depending on the selected Response Type, select available Options and Voice Type (i.e., John-Angry) settings.
- Using the Message Volume slider, adjust the volume of the AID Alert.
- Drag the slider past to enable the Boost AI Deterrence Audio Gain feature.
Note: Enabling this feature will increase the maximum audio range of the AI Audio but can cause distortion that affects audio clarity.
This slider value is shared with Two-Way Audio volume; however, the boost option only applies to AID. The volume slider is disabled when the boost is active, so it must be disabled to lower the audio volume.
- Drag the slider past
- Configure the Camera Light Alert and Camera Audio Alert as desired.
- In Stage 2, click to view the current Stage 2 settings.
- Using the Duration inside area of interest dropdown menu, select the delay between the end of Stage 1 and the beginning of Stage 2.
- Configure the Camera Light Alert and Camera Audio Alert as desired.
- If desired, click Stage 3 to enable configuration for a Stage 3 Progressive Response.
- To delete a Stage 3 Progressive Response, click
 .
- To delete a Stage 3 Progressive Response, click
- In Stage 3, click to view the current Stage 3 settings.
- Using the Duration inside area of interest dropdown menu, select the delay between the end of Stage 2 and the beginning of Stage 3.
- Configure the Camera Light Alert and Camera Audio Alert as desired.
- Using the Set minimum delay between Alerts dropdown menu, select the minimum delay between the end of one Progressive Response Alert and the beginning of the next Progressive Response Alert.
- Configure the rest of the recording rule as desired.
- Click Save.
- Log in to the Alarm.com customer website.
- Click Video.
- Click Recording Rules.
- Click Add New Rule.
- Click to select Video Analytics.
- Click to select the desired video camera.
- In Select Type, click to select the desired rule type.
- Click Next.
- In Motion area, configure the Ground Zone or Tripwire.
- Configure the options in the Record a Clip section as desired.
- Click Custom to configure specific timeframes for the AID-enabled recording rule to be active.
- Click the Perimeter Guard toggle switch to enable Alerts for the recording rule. Single Response Mode is selected by default.
- In Perimeter Guard, click the AI Deterrence Alert toggle switch to enable AI Deterrence for the recording rule. Dynamic Response is the default selection.
- Using the Response Type dropdown menu, select the response type (i.e., Deterrence (Default), Leave A Message, Not Accepting Visitors, Professionally Monitored, Property Closed, Trespassing).
- Depending on the selected Response Type, select available Options and Voice Type (i.e., John-Angry).
- Using the Message Volume slider, adjust the volume of the AID Alert.
- Drag the slider past to enable the Boost AI Deterrence Audio Gain feature.
Note: Enabling this feature will increase the maximum audio range of the AI Audio but can cause distortion that affects audio clarity.
This slider value is shared with Two-Way Audio volume; however, the boost option only applies to AID. The volume slider is disabled when the boost is active, so it must be disabled to lower the audio volume.
- Drag the slider past
- Configure the Camera Light Alert and Camera Audio Alert as desired.
- Using the Set minimum delay between Alerts dropdown menu, select the minimum delay between the end of one Dynamic Response Alert and the beginning of the next Dynamic Response Alert.
- Configure the rest of the recording rule as desired.
- Click Save.
- Log in to the Alarm.com customer website.
- Click Video.
- Click Recording Rules.
- Click Add New Rule.
- Click to select Video Analytics.
- Click to select the desired video camera.
- In Select Type, click to select the desired rule type.
- Click Next.
- In Motion area, configure the Ground Zone or Tripwire.
- Configure the options in the Record a Clip section as desired.
- Click Custom to configure specific timeframes for the AID-enabled recording rule to be active.
- Click the Perimeter Guard toggle switch to enable Alerts for the recording rule. Single Response Mode is selected by default.
- In Perimeter Guard, click the AI Deterrence Alert toggle switch to enable AI Deterrence for the recording rule.
- In AI Deterrence Alert, click Custom Response.
- In Message, enter the desired response.
Note: Make sure the text entered in the Message field uses correct spelling and grammar, and add spaces before and after numbers. - Using the Voice dropdown menu, select the desired voice and tone for the message.
- Configure the Camera Light Alert and Camera Audio Alert as desired.
- Using the Set minimum delay between Alerts dropdown menu, select the minimum delay between the end of one Custom Response Alert and the beginning of the next Custom Response Alert.
- Configure the rest of the recording rule as desired.
- Click Save.
Check event limits
AID utilizes Video Analytics and audio capabilities to play AID voice messages. When the maximum amount of monthly AID events is reached, it will revert to Perimeter GuardTM alerts as a backup. The amount of events available to a customer can be changed through the customer's service package and checked using the Alarm.com customer website.
AID SMS/Push notifications notify customers when they reach 50%, 80%, and 100% of their AID events quota. These notifications are enabled by default and can be managed under system events on the notifications page.
Note: After adding AID to the service package, 30 free events (in addition to the monthly recurring service package allotment) are provided. This allows the feature to be tested and configured without using the events included in the selected service package.
The 30 free events roll over if they are not used in the first month, but the service package monthly AID events do not.
To check AID event limits using the Alarm.com customer website:
- Log in to the Alarm.com customer website.
- Click Video.
- Click Recording Rules.

AID best practices
Ensuring Video Analytics accuracy
Ensuring Video Analytics accuracy
Ensuring Video Analytics accuracy
Ensuring Video Analytics accuracyBecause AID is dependent upon Video Analytics, it is important that the camera location, calibration, and rule configuration (ground zone or tripwire) is optimized. If you encounter a scenario where objects are being misclassified as people or clips uploading erroneously, verify the Video Analytics best practices are followed.
For more information, see Video Analytics best practices.
Select the appropriate add-on quantity
Select the appropriate add-on quantity
Select the appropriate add-on quantity
Select the appropriate add-on quantityIt is recommended to have the appropriate monthly limit for the maximum number of AI Deterrence events for your account. These events are assessed at the account level and do not need to be evenly distributed or used across each supported camera. For information about updating your add-on quantity, contact your service provider.
Example: On an account with 60 events and two cameras, one camera could use 40 events while the other could use 20.
Avoid excessive event usage
Avoid excessive event usage
Avoid excessive event usage
Avoid excessive event usageTo avoid expending the monthly AID event quota too quickly, we recommend configuring the camera Video Analytics rules to avoid areas with excessive foot traffic and clip uploads. Keep in mind:
- If a customer wants to enable the feature in more active traffic areas during down times, they can set up one of up to the three Video Analytics rules per camera to utilize the AID feature during those timeframes.
- If a customer wants active areas covered, their service package can be adjusted to include additional AID events. If they completely expend the monthly quota and do not want additional events, AID responses will automatically resume the first day of the next month.
Note: If an AID event is interrupted by a Two-Way Audio call, it will count toward the monthly quota.
Performance/latency
Performance/latency
Performance/latency
Performance/latencyAID event latency is classified as the time from when Perimeter GuardTM goes off until the AID voice message begins playing. The majority of AID events are expected to arrive within 8 seconds or less from the time that PG begins. There may be some variance in latency based on location, network connection method (wired/wireless), signal strength, and network congestion.
Configure the message type
Configure the message type
Configure the message type
Configure the message typeAID supports multiple message types and voices to respond to a wide range of activity. These message types and voices vary in severity and tone, so AID rules can be configured to meet each user's specific needs. Keep in mind that you can configure up to three recording rules which can be configured with or without AID so you can easily schedule these behaviors and get additional protection when it is needed most.
For example, you could schedule a harsh tone after hours but a friendly tone on a day where your business is closed during normal business hours.
Example use cases and setup
Example use cases and setup
Example use cases and setup
Example use cases and setupWith the addition of new response configuration options and voices, there are several ways to customize AID responses. Below is a guide that walks through a number of use cases and the best ways to configure your system to react in these scenarios.
| Scenario + Example | Suggested Rule Configuration | UI Snapshot | Notes |
|---|---|---|---|
|
Driveway
|
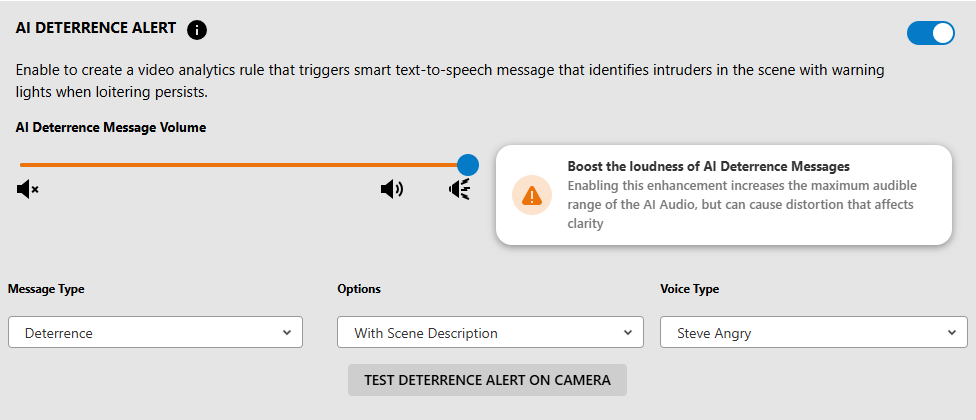
In the case of a residential driveway, you may want to configure AID to react to suspicious individuals approaching your property or vehicle, especially at night. Suggested Message Type: Deterrence Suggested Recording Rule Time Frame: Everyday 10:00 PM - 5:00 AM |
 |
Users may consider configuring privacy zones to cover areas outside of the driveway to improve the accuracy of responses. |
|
Backyard
|
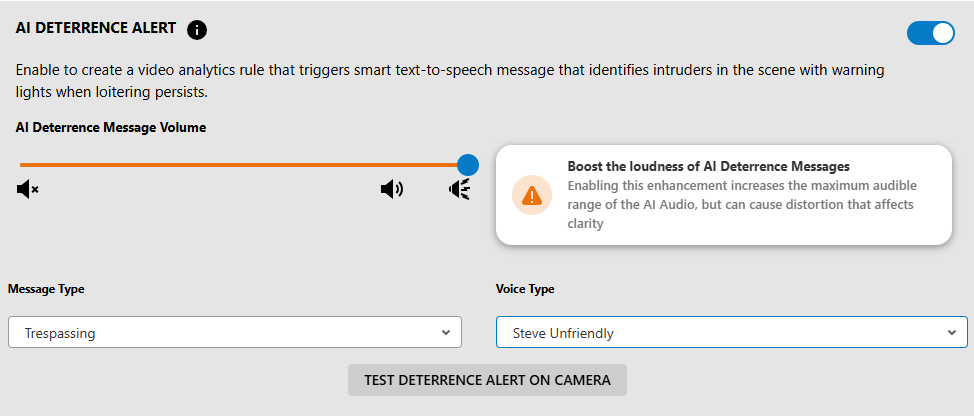
Back yards are often considered a private area and you may never expect to have visitors. Given the extremely low likelihood of activity, this is one scenario where it would be appropriate to have AID running 24/7. Suggested Message Type: Trespassing Suggested Recording Rule Time Frame: At all times |
 |
It is recommended that you pause this rule when increased backyard activity is expected (e.g., during a party or event) or when there may be scheduled landscaping work. |
|
Back Alley-way
|
A back alleyway or commercial loading dock is another example of a restricted area where a customer may want to deter activity. Here using a warning to deter visitors from rummaging through trash or causing damage is recommended. Suggested Message Type: Property Closed - Normal Suggested Recording Rule Time Frame: At all times |
 |
It is recommended that you pause this rule when increased activity is expected such as deliveries or trash pick up. |
|
Business Closed - After Hours
|
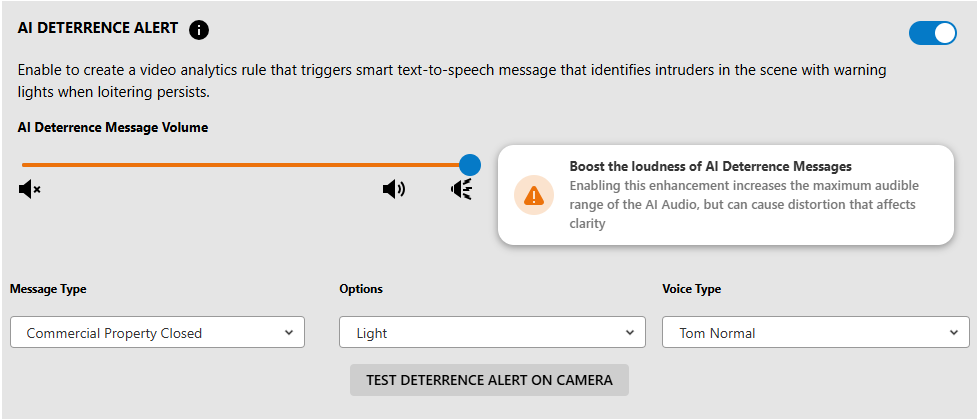
For a camera located at the front entrance of a business after hours, AID can be used to discourage loitering or inform visitors that the business is closed and to come back another time. Suggested Message Type: Property Closed - Normal, Trespassing Suggested Recording Rule Time Frame: At all times |
 |
|
|
Business Closed Lunch Break
|
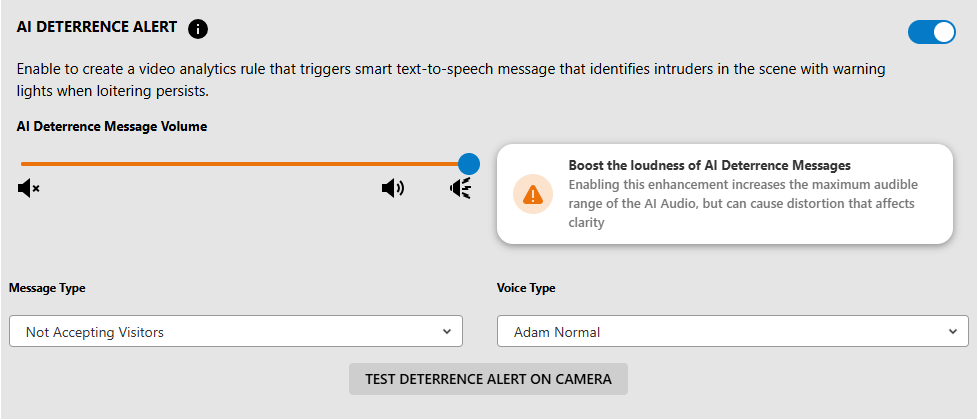
Businessess may occasionally be open but only to a select group of visitors or for private events and they may also close during lunch hours. In this situation, using the not accepting visitors message type would be the best option for a camera located at the front entrance of the business. Suggested Message Type: Not accepting visitors Suggested Recording Rule Time Frame: Monday through Friday 12:00 PM - 1:00 PM |
 |
|
|
Parking Lot - Night
|
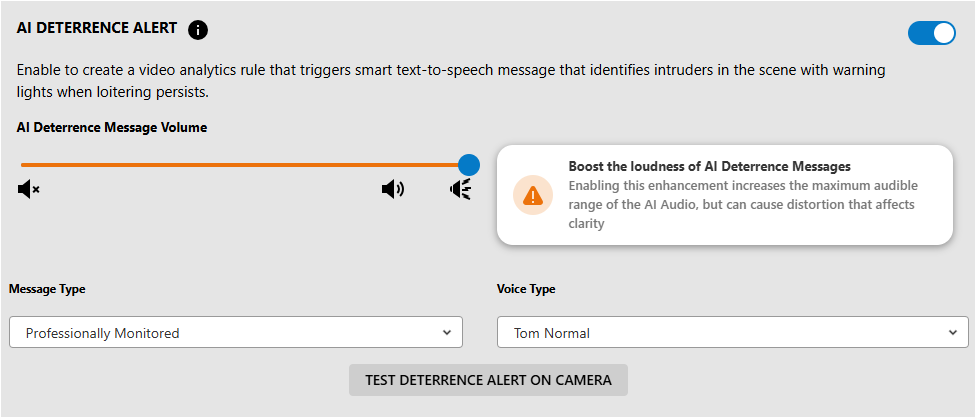
It is common for individuals to linger in parking lots or garages, especially at night. Using a strong warning on a garage camera with AID would effectively discourage inappropriate behavior and prompt unexpected visitors to leave the area. Suggested Message Type: Property Closed - Normal, Trespassing Suggested Recording Rule Time Frame: Everyday 10:00 PM - 5:00 AM |
 |
|
|
Property Owner Busy
|
When a property owner is busy or unable to answer the door, using the leave a message mode on the camera is a quick way to interact with visitors or delivery drivers. Suggested Message Type: Leave a Message Suggested Recording Rule Time Frame: Custom (i.e., Turn on the rule when busy as needed) |
 |


Frequently asked questions
How is Progressive Response Mode different from the standard AI Deterrence experience?
How is Progressive Response Mode different from the standard AI Deterrence experience?
How is Progressive Response Mode different from the standard AI Deterrence experience?
How is Progressive Response Mode different from the standard AI Deterrence experience?
Who can configure the Progressive Response Mode Stages?
Who can configure the Progressive Response Mode Stages?
Who can configure the Progressive Response Mode Stages?
Who can configure the Progressive Response Mode Stages?
What happens if a person leaves the Ground Zone area after triggering AI Deterrence and comes back?
What happens if a person leaves the Ground Zone area after triggering AI Deterrence and comes back?
What happens if a person leaves the Ground Zone area after triggering AI Deterrence and comes back?
What happens if a person leaves the Ground Zone area after triggering AI Deterrence and comes back?For Single Response Mode rules, the rule will follow its Minimum delay between clips cooldown timer before triggering again.
For Progressive Response Mode rules, the response sequence starts over with Stage 1 when the person re-enters the Ground Zone area.
Does Progressive Response Mode work with multiple people simultaneously?
Does Progressive Response Mode work with multiple people simultaneously?
Does Progressive Response Mode work with multiple people simultaneously?
Does Progressive Response Mode work with multiple people simultaneously?
Does each stage within a Progressive Response Mode escalation count as a different AID Event?
Does each Stage within a Progressive Response Mode escalation count as a different AID Event?
Does each stage within a Progressive Response Mode escalation count as a different AID Event?
Does each Stage within a Progressive Response Mode escalation count as a different AID Event?